Saturday, December 7, 2019

graph-commit project

graph-commit project: Powershell "interpreter" for Cypher


This is the evolution from my 2nd draft: Using Powershell to execute cypher scripts with secure credentials and logging results/errors.

What was the issue?

I was running several
.cypher scripts as a scheduled task on Windows using cypher-shell to execute them.  This was fine, however my .cypher files had to provide plain-text to authenticate to various REST-API sites (and other datasources) I was using to feed my Neo4j database.  So I created some powershell credential storage/retrieval functions.

What was the other issue?
As I made changes to my scripts, I would inevitably write some syntax errors into my cypher scripts, and unknowingly break my import process.  But often, just break it a little.  Unless I manually ran each bit of code in the Neo4j Browser, I didn't have a simple method to verify or validate the results (or lack-thereof).

MY SOLUTION: A set of powershell scripts/cmdlets that would allow cypher execution and log the results (and some statistics meta-data), while showing syntax errors (exceptions) from the cypher.  I use the term "interpreter" loosely.

HOW IT WORKS:

  • Provide a Cypher query language (cql) source file script that you wish to execute.  Be sure to replace any sensitive credentials or session keys with a unique string or "placeholder text" For example: mysecretvaluegoeshere
  • Supply your Neo4j database destination & credentials by first using set-regcredentials.ps1

  • Then supply any additional (API, web credentials) also using set-regcredentials.ps1

    Any credentials stored with set-regcredentials store the password (in the registry) with secure-string. This is relatively secure, as it can only be retrieved by the SAME username logged onto the SAME computer.  In a future version I'd prefer the script retrieve credentials from a secure store like Vault (HashiCorp)
  • When executing the commandline you can supply -creds1 (thru -creds4) to have the wrapper perform a find-replace based on the key/value pair you created with set-regcredentials.ps1
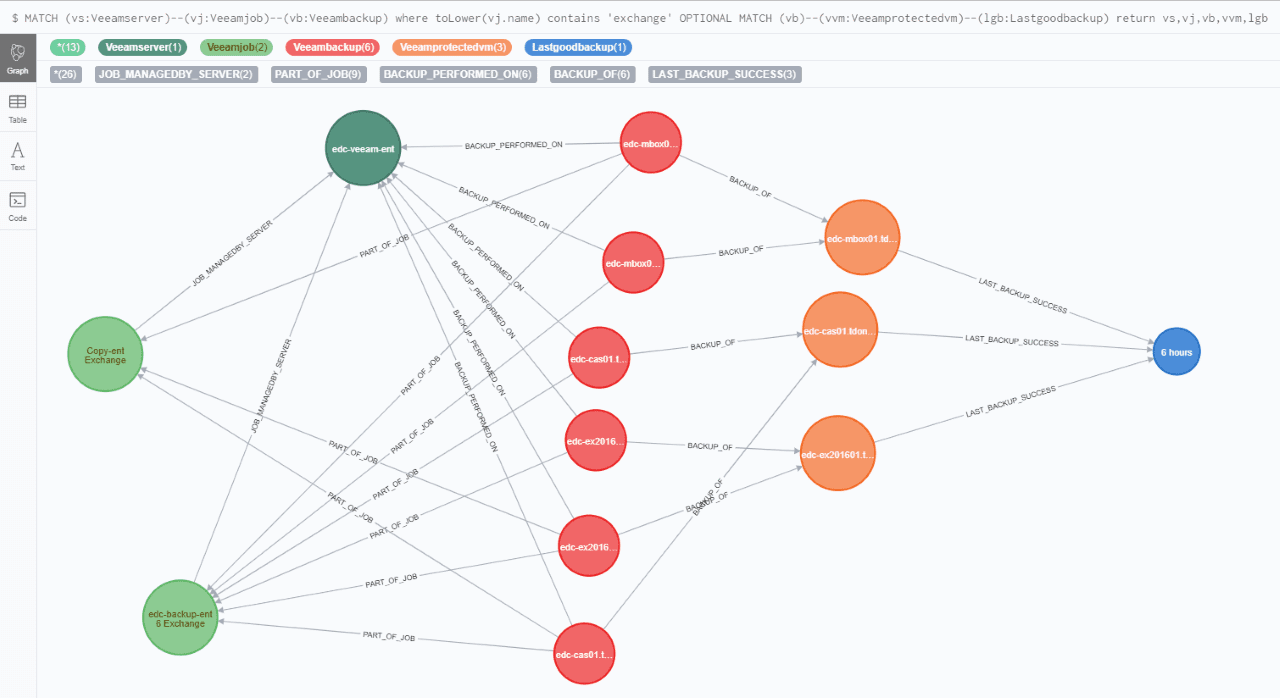
  • Alternatively you can supply data in realtime on the commandline using the -findrep switch (then you supply json values of find/replace string pairs) This is useful for manual testing, or if you are supplying a dynamic sessionkey.  This would be common when authenticating to a WebAPI that gives you a one-time-use key for authorization.  We use this method when graphing data using the Veeam Backup Enterprise Manager webAPI.
Then execute your cypher by running get-cypher-results.ps1:
 POWERSHELL 
.\get-cypher-results.ps1 -Datasource 'N4jDataSource' -cypherscript 'C:\path-to-my-script\myscript.cypher' -logging 'N4jDataSource' -creds1 'mycredname'

Or let's say you wanted to embed some cypher execution within another powershell script.  You may do something like this:

 POWERSHELL 
cd "$env:programfiles\blue net inc\graph-commit"
. "$PSScriptRoot\bg-sharedfunctions.ps1" | Out-Null
$neo4jdatasource = "myn4jserver"
$scriptpath = -join ($PSScriptRoot,"\get-cypher-results.ps1")
$csp= "c:\the-path-to\my-source-script.cypher"
$frstring='{"mysecretvaluegoeshere":"1234567890abcd"}'
. $scriptPath -Datasource $neo4jdatasource -cypherscript $csp -logging $neo4jdatasource -findrep $frstring -verbosity 1


Results:


The get-cypher-results.ps1 will segment your script into individual transactions (a semicolon followed by a linefeed)

You can also give "sections" of your code a label by using the keyword section at the beginning of comments in the cypher script:

// section Main import routine to create (:Asset) nodes

...
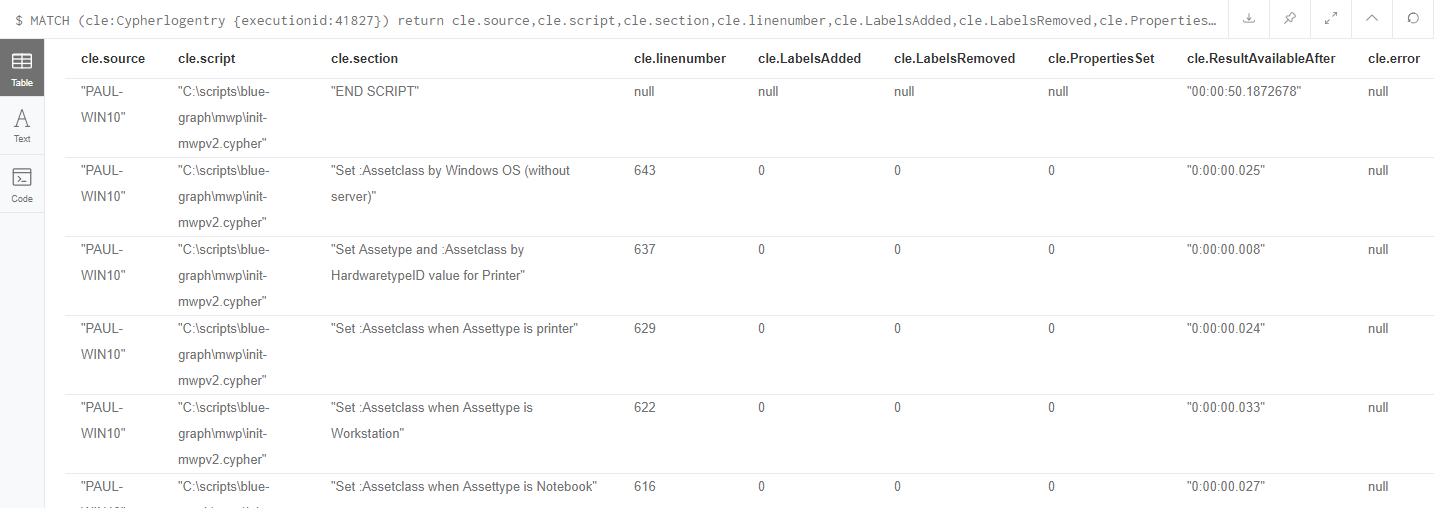
Each transaction will be run and the metadata results will be (optionally) recorded in a log entry (per transaction).  The logging is done (of course) as a neo4j graph using the label 
(:Cypherlogentry) The following counter items will be recorded as properties:

ConstraintsAdded
ConstraintsRemoved
IndexesAdded
IndexesRemoved
LabelsAdded
LabelsRemoved
NodesDeleted
Notifications
Plan
Profile
PropertiesSet
RelationshipsCreated
RelationshipsDeleted
ResultAvailableAfter
 (how long did the transaction take to run)
StatementType
Version (of the target Neo4j server)
date (epoch when the transaction ran)
linenumber (of where this transaction begins in the script)
script (full path and filename of the .cypher script)
section (named section of code)
server: fqdn or IP and port of the neo4j server
source: name of the computer the powershell script was executed from
error: (any exception error thrown by the neo4j engine will be recorded here)
All transactions from a single .cypher script will be bookended by a "BEGIN SCRIPT" and "END SCRIPT" section marker, with the END SCRIPT logging a "ResultAvailableAfter" that is a sum of all the transactions within the script.

All entries for a particular script execution will be tied together with a relationship: 
-[:PART_OF_SCRIPT_EXECUTION]- The wrapper will complete the execution and supply some example cypher queries to return the error logging for that execution.


This gave me a method to quickly run batches of .cypher code against a neo4j database, and determine if I generated any exceptions, and log metadata to track trends for code sections.


GRAPH-COMMIT Installation procedure: 


PRE-REQUISITES:
  • Windows PC or server
  • An existing neo4j database installation.  If you need help visit the Configuring Neo4j server post.
  • Powershell v5.0 or newer
  • DotNET neo4j driver (script will install if it is missing)


Script Repositories:
  • Github repo: pdrangeid/graph-commit
    Please review github code before running it in your environment!  Be safe folks!

powershell
set-executionpolicy remotesigned -scope Process

Run the following commands to download them from the git repositories via 
 POWERSHELL 
[Net.ServicePointManager]::SecurityProtocol = [Net.SecurityProtocolType]::Tls12
$client = new-object System.Net.WebClient
$client.DownloadFile("https://raw.github.com/pdrangeid/graph-commit/master/update-modules.ps1","$Env:Temp\update-modules.ps1")
. "$Env:Temp\update-modules.ps1"

The 'update-modules.ps1' script can be used to update graph-commit scripts automatically (or from other git repositories)  I use to to automatically update my own operational scripts via windows scheduled tasks.


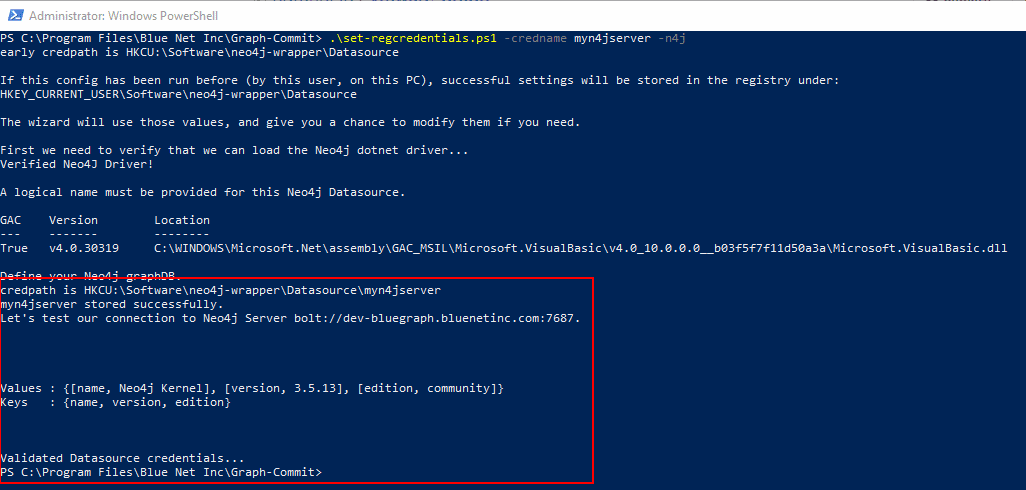
Configure your Neo4j datasource by providing the servername and credentials.  This will also verify that you have the DotNet neo4j driver installed (will prompt to install for you if it is missing)


 POWERSHELL 
cd "$env:Programfiles\Blue Net Inc\Graph-Commit"
.\set-regcredentials.ps1 -credname myn4jserver -n4j
 

If you haven't already installed the Neo4j DotNet driver, click no, and then answer YES when prompted to install it for you.


You will be prompted within the powershell to confirm installation of the Neo4j driver.

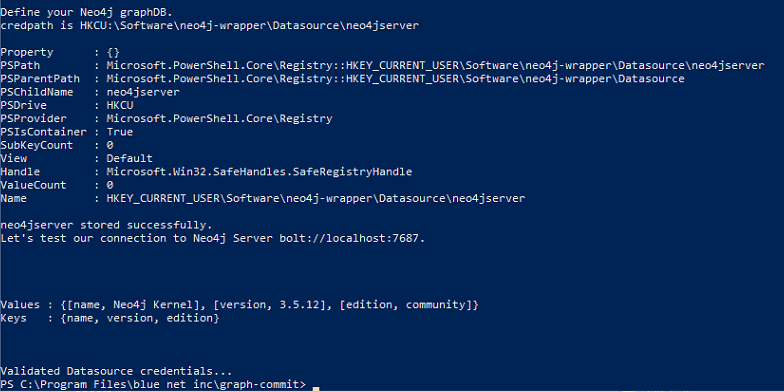
If it is successfully installed you will next be prompted to verify the logical name for the Neo4j datasource to be stored:


Next provide the address for your Neo4j server.  Neo4j's binary binary protocol is bolt, and defaults to TCP port 7687.  You can customize this and use name or ip address.


If the Neo4j server was able to be verified you will be asked to provide logon credentials.


If your credentials are correct you should see something like this:


You are now ready to run your .cypher scripts via powershell.

Review the get-cypher-results.ps1 script for more detail, but the command line works as such:

.\get-cypher-results.ps1 -Datasource 'yourdatasource' -cypherscript 'path-to-cypher-source-code' -creds1 -findrep {json string for find/replace pairs}
There are examples of using the get-cypher-results powershell wrapper for Cypher in my other posts. 


Wednesday, November 20, 2019

Create Veeam Graph

via the Veeam Backup Enterprise Manager webAPI


Problem:

How can I identify VMs that were never properly configured for backups.  Or somehow aren't being backed up at the frequency intended?

Solution:

Create a knowledge graph with data from my Veeam backup servers in order to verify that backups were configured and running for intended VMs. 

For example: The data could be compared via query against data in your IT Asset Management that defines which machines are supposed to be protected.

You may find it helpful to also have your VMware data within your graph.  Here's how to do that.

The schema for this graph is fairly simple:


But enough of all that, on to the instructions!

Prerequisites:

Known Issues:
    • The scripts currently don't clean up after themselves.  I'm still working out exactly how often to purge old job data.  You could also just INIT the whole graph periodically.
    • This graph isn't intended to import ALL information about backups.  It's focused on capturing the latest successful backup for each configured VM.

Installation: Steps (powershell)
Login using the account you intend to use (particularly if scheduling for automation) 
Now download the scripts to run the veeam data ingester from the github repositories via powershell:
This will result in the scripts being downloaded into %programfiles%\blue net inc\Graph-Commit"\

 POWERSHELL 
cd "$env:programfiles\blue net inc\graph-commit"
.\update-modules.ps1 -gitrepo pdrangeid/veeam-maint -gitfile purge-veeam.cypher
.\update-modules.ps1 -gitrepo pdrangeid/veeam-maint -gitfile init-veeam-wrapper.ps1
.\update-modules.ps1 -gitrepo pdrangeid/veeam-maint -gitfile init-veeam.cypher
.\update-modules.ps1 -gitrepo pdrangeid/veeam-maint -gitfile refresh-veeam.cypher
.\update-modules.ps1 -gitrepo pdrangeid/veeam-maint -gitfile refresh-veeam-last-backup.cypher

If this is the first time using your neo4j database with my scripts, you will need to identify your Neo4j server location and provide credentials.


This cmdlet will also verify you have the DotNET neo4j driver installed (The set-regcredentials cmdlet can install it automatically for you using the nuget package manager):

 POWERSHELL 
.\set-regcredentials.ps1 -credname myn4jserver -n4j

The prerequisites (Nuget, Neo4J dotNet driver) will be validated and prompted to be installed if missing.  Once complete it will validate connectivity to your neo4j database instance.  A successful result should look like this:


Now let's set our veeam credentials and store them in the registry.This will display a prompt for you to supply your veeam username and password.  This data will be stored in

HKEY_CURRENT_USER\Software\neo4j-wrapper\Credentials\yourveeamservername

The password will be stored as a securestring value which can only be decrypted on this computer when logged in as the user you are currently authenticated as now.

If successful you will see a message, you can also verify it in the registry:
 POWERSHELL 
.\set-regcredentials.ps1 -credname yourveeamservername -credpath "neo4j-wrapper\Credentials"

Let's test the script.  By using the -sessionkey switch we indicate we don't want to run the script, but just authenticate to the VeeamAPI and return a session key to use.
 POWERSHELL 
.\init-veeam-wrapper.ps1 -baseapiurl http://yourveeamserver:9399/api -veeamcred myveeam -neo4jdatasource myn4jserver -sessionkey
 

If you returned a proper session id that means the wrapper script was able to retrieve a session key for authentication.  Run the command again omitting the -sessionkey switch and adding the -init switch to run the script for real this time.

 POWERSHELL 
.\init-veeam-wrapper.ps1 -baseapiurl http://yourveeamserver:9399/api -veeamcred myveeam -neo4jdatasource myn4jserver -init
What does -init do?
The -init switch runs the initial ingestion of Veeam backups.  It also takes the longest.

a)  Creates (:Veeamserver) nodes
b)  Create (:Veeamjob) nodes, and relates them to their (:Veeamserver)
 
c) Creates (:Veeamprotectedvm) nodes (these are all the VMs that Veeam is aware of)

d) Finally it locates restore points to discover the MOST RECENT restore point for each (:Veeamprotectedvm)
Discovery is performed from most recent through 32 days old.  Once a valid restore point is discovered it stops trying to find valid restore points for that VM (remember, we're just trying to validate the most recent valid restore point for each protected asset)


If you have multiple Veeam backup servers, be sure to run the -init process for any additional Veeam API endpoints.
Now we want to put the Veeam backups into "buckets" identifying how recently they are backed up:

 POWERSHELL 
$scriptpath = "$env:programfiles\blue net inc\graph-commit\get-cypher-results.ps1"
$csp="$env:programfiles\blue net inc\graph-commit\refresh-veeam-last-backup.cypher"
. $scriptPath -Datasource 'myn4jserver' -cypherscript $csp -logging 'myn4jserver'

Finally, you can now run the lighter-weight "refresh" script periodically (I run it hourly).
You only need to re-run the "init" script if you want to purge the data and start over.

 POWERSHELL 
$scriptpath = "$env:programfiles\blue net inc\graph-commit\get-cypher-results.ps1"
$csp="$env:programfiles\blue net inc\graph-commit\refresh-veeam-last-backup.cypher"
. $scriptPath -Datasource 'myn4jserver' -cypherscript $csp -logging 'myn4jserver'

Review the Veeam data that was imported.  Here are some sample cypher queries that will present an explorable graph:
 CYPHER 
// SHOW veeam backups
MATCH (lgb:Lastgoodbackup)
MATCH (lgb)--(vvm:Veeamprotectedvm)
return lgb,vvm


Show specific Job information:

 CYPHER 
// Show jobs, backups, VMs, and lastgoodbackup for any jobs with 'exchange' in the job name
MATCH (vs:Veeamserver)--(vj:Veeamjob)--(vb:Veeambackup) where toLower(vj.name) contains 'exchange'
OPTIONAL MATCH (vb)--(vvm:Veeamprotectedvm)--(lgb:Lastgoodbackup)
return vs,vj,vb,vvm,lgb


Tuesday, November 12, 2019

Create vCenter Graph


Import vCenter infrastructure into a knowledge graph using Neo4j


Yes, I could have directly queried the Vmware WebAPI, but dealing with self-signed certificates and discovering all the API queries would have been a LOT of work.  RVTools conveniently already gathers ALL the data I'm looking for and exports it into a single Excel file, which makes this process quite a bit easier.

When complete this process will create the following database schema in your neo4j database:


Prerequisites:

Known Issues
    • Only tested against vCenter clusters (not standalone vsphere host output)
    • The script only builds Standard vSwitch and ports/portgroups.
      distributed virtual switches and ports ARE present in the .xls data export, but the .cypher will need modifications to properly map DV objects.


Installation: Steps (powershell)

Login using the account you intend to use (particularly if scheduling for automation) 
Now download the script files to run the veeam data collector from the github repositories
 POWERSHELL 

cd "$env:programfiles\blue net inc\graph-commit"
.\update-modules.ps1 -gitrepo pdrangeid/vmware-graph -gitfile refresh-vmware.cypher

If this is the first time using your neo4j database with my scripts, you will need to identify your Neo4j server location and provide credentials. This cmdlet will also verify you have the DotNET neo4j driver installed (The set-regcredentials cmdlet can install it automatically for you using the nuget package manager)
 POWERSHELL 
.\set-regcredentials.ps1 -credname myneo4jserver -n4j


    The prerequisites (Nuget, Neo4J dotNet driver) will be validated and prompted to be installed if missing.  Once complete it will validate connectivity to your neo4j database instance.  A successful result should look like this:


    First let's generate your output file from rvtools.
    The example below assumes we will use passthru authentication for the vCenter server.  Review the RVTools documentation for specifying credentials.
    The resulting excel document will be placed in the import subfolder within the neo4j installation path (adjust this for your environment)

     POWERSHELL 
    [string] $RVToolsPathexe = ${env:ProgramFiles(x86)}+"\Robware\RVTools\RVTools.exe"
    $Arguments = " -passthroughAuth -s fqdn.yourvcenterserver.com -c ExportAll2xlsx -d c:\neo4j-community-3.5.12\import 
    -f fqdn.yourvcenterserver.com.xlsx"
    $Process = Start-Process -FilePath $RVToolsPathExe -ArgumentList $Arguments -NoNewWindow -Wait
    

    If all went well you should have your vcenter environment exported into the excel document in c:\neo4j-community-3.5.12\import

    Now we want to run the import process to ingest the data into the graph.

    The $findstring variable is used to perform a find/replace the placeholder (in the .cypher script you downloaded earlier) for the path/file to your excel document.

    Replace the 'neo4jserver' with the name of the neo4j datasource credential you used with the set-regcredentials.ps1 earlier. 


     POWERSHELL 
    cd "$env:programfiles\blue net inc\graph-commit"
    $scriptpath = -join ($env:ProgramFiles,"\blue net inc\graph-commit\get-cypher-results.ps1")
    $findstring='{"path-to-vmware-import-file":"file:///c:/neo4j-community-3.5.12/import/fqdn.yourvcenterserver.com.xlsx"}'
    $csp=$(-join ($env:programfiles,"\blue net inc\graph-commit\refresh-vmware.cypher"))
    $result = . $scriptPath -Datasource 'myneo4jserver' -cypherscript $csp -logging 'myneo4jserver' -findrep $findstring
    

    A successful import will cycle through the transactions and give you log queries to validate:

    Use the Neo4j browser: http://your-neo4jserver:7474Login with your credentials
    Review the cypher logs (run the log queries that were output from the script execution above)
    Review the VMware data that was imported.Here are some sample cypher queries that will present an explorable graph:


     CYPHER 
    // SHOW vcenter, datacenter, cluster, folders and resource groups:
    MATCH (vc:Vcenterserver)
    MATCH (vc)--(vdc:Vspheredatacenter)
    MATCH (vc)--(vcc:Vcentercluster)
    WITH *,'/'+vdc.name as startpath
    OPTIONAL MATCH (vf:Vfolder) where vf.path starts with startpath
    OPTIONAL MATCH (vrp:Vresourcepool) where vrp.path starts with startpath
    WITH *
    MATCH (vm:Virtualmachine) where (vm)--(vf) or (vm)--(vrp) or (vm)--(vcc) or (vm)--(vdc)
    return vc,vdc,vcc,vf,vrp,vm


    DNS and NTP query:
     CYPHER 
    // SHOW vSphereHosts DNS,NTP, and vCenter relationships MATCH (vh:Vspherehost)
    OPTIONAL MATCH (vh)--(ds:Dnsserver)
    OPTIONAL MATCH (vh)--(ns:Ntpserver)
    OPTIONAL MATCH (vh)--(vc:Vcenterserver)
    return vh,ds,ns,vc


    vSphere Hosts and datastores:

     CYPHER 
    // SHOW vSpherehost datastores, types, and vcenter
    MATCH (vh:Vspherehost)
    OPTIONAL MATCH (vh)--(ds:Vdatastore)
    OPTIONAL MATCH (ds)--(dst:Vdatastoretype)
    OPTIONAL MATCH (vh)--(vc:Vcenterserver)
    return vh,ds,dst,vc


    vSwitch, Portgroups, and Loadbalancing policies:

     CYPHER 
    // SHOW vSwitch portgroups, and lbpolicies
    MATCH (vh:Vspherehost)
    OPTIONAL MATCH (vh)--(vs:Vswitch)
    OPTIONAL MATCH (vs)--(vlbp:Vlbpolicy)
    OPTIONAL MATCH (vpg:Vportgroup)
    OPTIONAL MATCH (vhpg:Vhostportgroup)--(vpg)
    RETURN vh,vs,vpg,vhpg,vlbp
    

    Configuring Neo4j server


    Configuring Neo4j server:


    Yes, there are plenty of tutorials for setting up Neo4j already, but I wanted to focus on a few settings that makes it easier to use it with data integration.

    This tutorial will focus on Neo4j server for windows.  It is NOT very complicated, and you'll be up and running in no time flat:

    What you need to before you begin
    System Requirements:

    • Windows PC or server
    • JAVA (OpenJDK/Oracle/IBM Java) 8 or greater
    • Neo4j Server or Desktop Edition.For these instructions I used the community edition which you can download from https://neo4j.com/download-center/#community

    1. Extract the archive into the folder you want to be your installation folder
    2. Use an editor to modify /conf/neo4j.conf
      Setting
      Action
      Description
      #dbms.directories.import=import
      Comment out
      allows custom imports on-demand
      apoc.import.file.enabled=true
      add
      Allow APOC file imports
      #dbms.memory.heap.initial_size=5g
      #dbms.memory.heap.max_size=5g
      #dbms.memory.pagecache.size=7g
      customize memory
      Memory configuration will depend on how large your graphDB will become.  Here's a good primer:
       
      https://neo4j.com/docs/operations-manual/current/tools/neo4j-admin-memrec/
      dbms.connectors.default_listen_address=0.0.0.0
      uncomment
      Allows non-local connections
    3. Configure Plugins:
      Plugin
      Description
      Download URL
      Notes
      Don't ask, just install it.  No really!  You want this.
      Install binary .jar into /plugins folder
      MSSQL JDBC
      Add this if you need to connect to MS SQL
      Extract mssql-jdbc-7.x.x.jre8.jar into /plugins folder
      Excel (multiple file formats)
      To support import from these formats download the dependencies
      https://repo1.maven.org/maven2/org/apache/poi/poi/4.1.2/poi-4.1.2.jar
      https://repo1.maven.org/maven2/org/apache/poi/poi-ooxml/4.1.2/poi-ooxml-4.1.2.jar
      https://repo1.maven.org/maven2/org/apache/poi/poi-ooxml-schemas/4.1.2/poi-ooxml-schemas-4.1.2.jar
      https://repo1.maven.org/maven2/org/apache/xmlbeans/xmlbeans/3.1.0/xmlbeans-3.1.0.jar
      https://repo1.maven.org/maven2/com/github/virtuald/curvesapi/1.06/curvesapi-1.06.jar
      Place these .jar files into the /plugins folder
      Advantage Database
      To connect to Advantage (sybase) SQL  via JDBC
      This is to support the CRM I use (CommitCRM)
    4. Configure Windows Service
      Neo4j should be configured to run as a Windows service. Launch a command shell, and install the service from within the /bin folder

      neo4j install-service

      If you are upgrading from an older version, you will need to first unregister the service for the old version:
      neo4j uninstall-service
        
    5. Set Initial Password
      neo4j-admin set-initial-password mysupersecretpassword

    6. Start the service
      sc start neo4j
      (or use the service control panel)

      That's it!  You should be ready to go with a neo4j server that's ready to connect to SQL Server, import from CSV/XLS files, and you will have the APOC library plugins at your disposal!