via the Veeam Backup Enterprise Manager webAPI
Problem:
How can I identify VMs that were never properly configured for backups. Or somehow aren't being backed up at the frequency intended?
Solution:
Create a knowledge graph with data from my Veeam backup servers in order to verify that backups were configured and running for intended VMs.
For example: The data could be compared via query against data in your IT Asset Management that defines which machines are supposed to be protected.
You may find it helpful to also have your VMware data within your graph. Here's how to do that.
The schema for this graph is fairly simple:

But enough of all that, on to the instructions!
Prerequisites:
|
|
Known Issues:
|
|
Installation: Steps (powershell)
Login using the account you intend to use (particularly if scheduling for
automation) This will result in the scripts being downloaded into %programfiles%\blue net inc\Graph-Commit"\
cd "$env:programfiles\blue net inc\graph-commit"
.\update-modules.ps1 -gitrepo pdrangeid/veeam-maint -gitfile purge-veeam.cypher
.\update-modules.ps1 -gitrepo pdrangeid/veeam-maint -gitfile init-veeam-wrapper.ps1
.\update-modules.ps1 -gitrepo pdrangeid/veeam-maint -gitfile init-veeam.cypher
.\update-modules.ps1 -gitrepo pdrangeid/veeam-maint -gitfile refresh-veeam.cypher
.\update-modules.ps1 -gitrepo pdrangeid/veeam-maint -gitfile refresh-veeam-last-backup.cypher
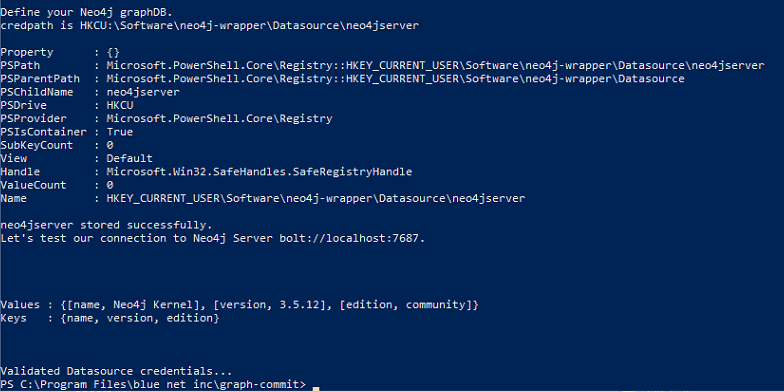
If this is the first time using your neo4j database with my scripts, you will need to identify your Neo4j server location and provide credentials.
This cmdlet will also verify you have the DotNET neo4j driver installed (The set-regcredentials cmdlet can install it automatically for you using the nuget package manager):
POWERSHELL
.\set-regcredentials.ps1 -credname myn4jserver -n4j
The prerequisites (Nuget, Neo4J dotNet driver) will be validated and prompted to be installed if missing. Once complete it will validate connectivity to your neo4j database instance. A successful result should look like this:
Now let's set our veeam credentials and store them in the registry.This will display a prompt for you to supply your veeam username and password. This data will be stored in
HKEY_CURRENT_USER\Software\neo4j-wrapper\Credentials\yourveeamservername
The password will be stored as a securestring value which can only be decrypted on this computer when logged in as the user you are currently authenticated as now.
If successful you will see a message, you can also verify it in the registry:
POWERSHELL
.\set-regcredentials.ps1 -credname yourveeamservername -credpath "neo4j-wrapper\Credentials"
POWERSHELL
.\init-veeam-wrapper.ps1 -baseapiurl http://yourveeamserver:9399/api -veeamcred myveeam -neo4jdatasource myn4jserver -sessionkey

If you returned a proper session id that means the wrapper script was able to retrieve a session key for authentication. Run the command again omitting the -sessionkey switch and adding the -init switch to run the script for real this time.
POWERSHELL
.\init-veeam-wrapper.ps1 -baseapiurl http://yourveeamserver:9399/api -veeamcred myveeam -neo4jdatasource myn4jserver -init
The -init switch runs the initial ingestion of Veeam backups. It also takes the longest.
a) Creates (:Veeamserver) nodes
b) Create (:Veeamjob) nodes, and relates them to their (:Veeamserver)

c) Creates (:Veeamprotectedvm) nodes (these are all the VMs that Veeam is aware of)
d) Finally it locates restore points to discover the MOST RECENT restore point for each (:Veeamprotectedvm)
Discovery is performed from most recent through 32 days old. Once a valid restore point is discovered it stops trying to find valid restore points for that VM (remember, we're just trying to validate the most recent valid restore point for each protected asset)

If you have multiple Veeam backup servers, be sure to run the -init process for any additional Veeam API endpoints.d) Finally it locates restore points to discover the MOST RECENT restore point for each (:Veeamprotectedvm)
Discovery is performed from most recent through 32 days old. Once a valid restore point is discovered it stops trying to find valid restore points for that VM (remember, we're just trying to validate the most recent valid restore point for each protected asset)
Now we want to put the Veeam backups into "buckets" identifying how recently they are backed up:
POWERSHELL
$scriptpath = "$env:programfiles\blue net inc\graph-commit\get-cypher-results.ps1"
$csp="$env:programfiles\blue net inc\graph-commit\refresh-veeam-last-backup.cypher"
. $scriptPath -Datasource 'myn4jserver' -cypherscript $csp -logging 'myn4jserver'
Finally, you can now run the lighter-weight "refresh" script periodically (I run it hourly).
You only need to re-run the "init" script if you want to purge the data and start over.
POWERSHELL
$scriptpath = "$env:programfiles\blue net inc\graph-commit\get-cypher-results.ps1"
$csp="$env:programfiles\blue net inc\graph-commit\refresh-veeam-last-backup.cypher"
. $scriptPath -Datasource 'myn4jserver' -cypherscript $csp -logging 'myn4jserver'
Review the Veeam data that was imported. Here are some sample cypher queries that will present an explorable graph:
CYPHER
// SHOW veeam backups
MATCH (lgb:Lastgoodbackup)
MATCH (lgb)--(vvm:Veeamprotectedvm)
return lgb,vvm

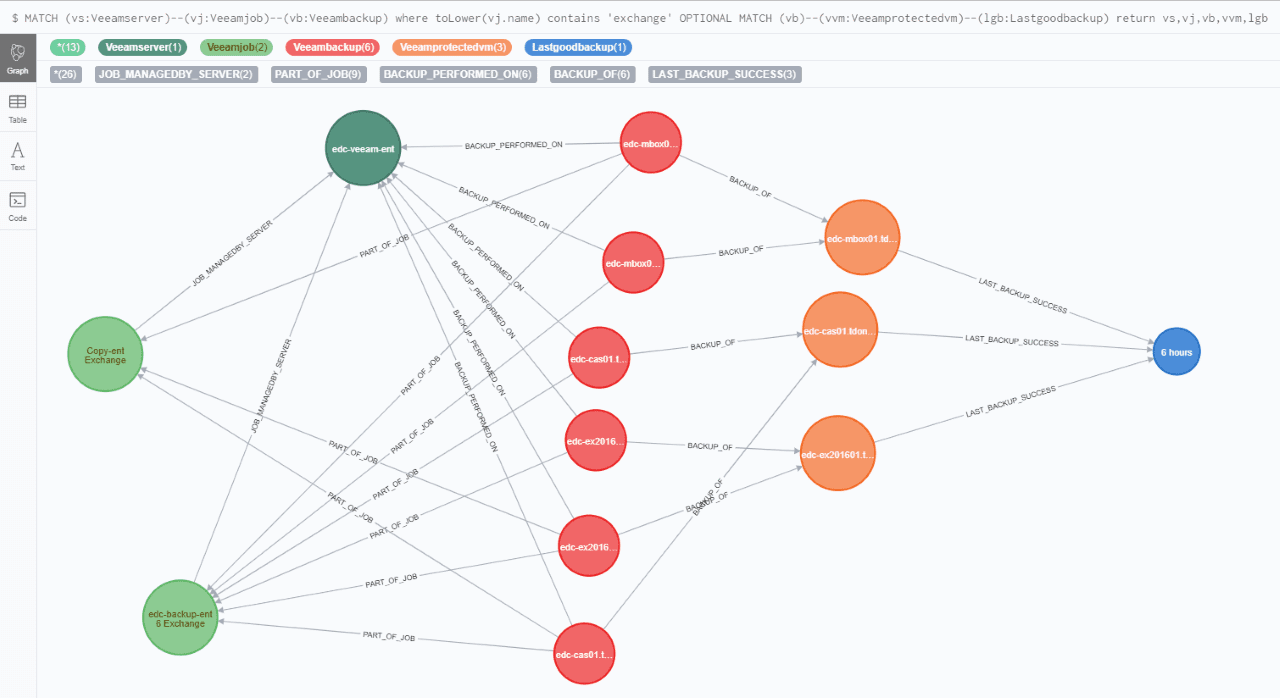
Show specific Job information:
CYPHER
// Show jobs, backups, VMs, and lastgoodbackup for any jobs with 'exchange' in the job name
MATCH (vs:Veeamserver)--(vj:Veeamjob)--(vb:Veeambackup) where toLower(vj.name) contains 'exchange'
OPTIONAL MATCH (vb)--(vvm:Veeamprotectedvm)--(lgb:Lastgoodbackup)
return vs,vj,vb,vvm,lgb