Configure RangerMSP (CommitCRM) database connection in PDI
Once your Pentaho server is installed and working, you will want to establish a connection to your RangerMSP database.This tutorial will show you how to enable connectivity between Pentaho and Neo4j:
What you need to before you begin
|
|
- Create a Windows File share for the CommitCRM folder. Grant permissions (file and share) to the computer account of your Pentaho (PDI) server.
- Download the Advantage JDBC database driver 11. You will need to install the driver, then browse to the installation folder, find and copy the jar file into the /lib folder of your Pentaho server installation.
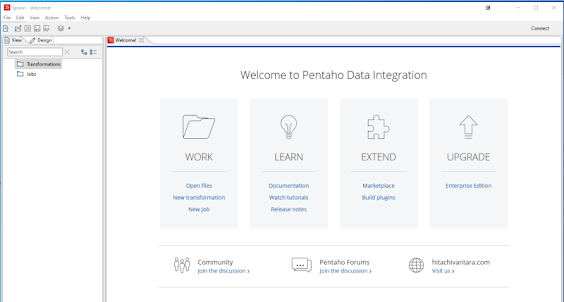
- Launch Spoon
Create a new transformation, and select the "Execute SQL Script" Step and drag it onto the transformation. - View the properties dialog
by double clicking on it, or right-click → Edit
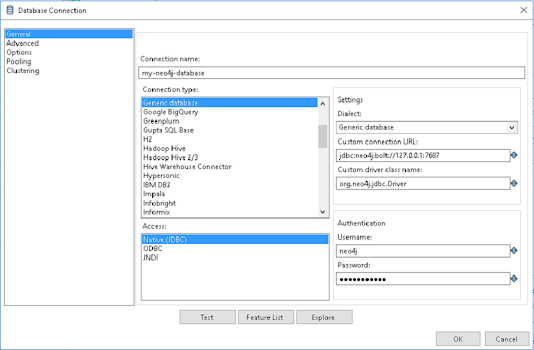
Then on the Connection property, click New - Use the following Connection Settings
note, there is no username/password. rather, access to the DB is controlled via file/share permissions on your RangerMSP server. Be sure your Pentaho Computeraccount$ has been given file/share permission on the shareConnection Name<A unique descriptive name>Connection TypeGeneric databaseAccessNative (JDBC)Custom connection URLjdbc:extendedsystems:advantage://<servername>:6262;catalog=//<servername>/CommitCRM/DbCustom driver class namecom.extendedsystems.jdbc.advantage.ADSDriver *note this is case sensitive!UsernamePassword
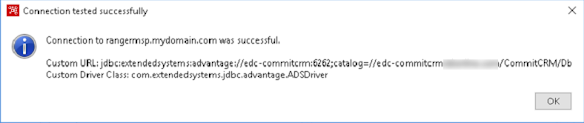
- Click "Test" and verify connectivity to your neo4j database
If successful you should see the following message: - "SHARE" this database connection
with other transformations/jobs, otherwise you would have to repeat these steps for EACH Transformation/Job.
Switch from the Design to the View Tab - Expand Database connectionsRight-Click on your new database connection and select Share


You will know the connection is shared if it is displayed in "BOLD".
Now this connection is available to all jobs/transformations for this installation of Spoon/PDI.
Now this connection is available to all jobs/transformations for this installation of Spoon/PDI.