Configure Neo4j 4.x database connection in PDI
Once your Pentaho server is installed and working, you will want to establish a connection to your Neo4j database.This tutorial will show you how to enable connectivity between Pentaho and Neo4j:
What you need to before you begin
|
|
Because I frequently use both the generic "Execute SQL script" tasks - which uses the generic PDI database connections and supports multi-transaction CYPHER statements, and ALSO the open source Neo4j output plugin by @mattcasters because it handles data maps and parameters passed from other steps WAY more elegantly than the "Execute SQL script" task. We will need to configure two neo4j database configurations.
For this tutorial the neo4j server is the same server as the Pentaho Data Integration server. (So you will see the 127.0.0.1 address) - If you have these on separate computers, either use the FQDN or IP address of your neo4j server in the various name/address fields.
- Download the latest Neo4j database JDBC driver and place the jar file in the /lib folder of your Pentaho server installation.
- Download the latest PDI neo4j output plugin, unzip and place the neo4j output folder in the /plugins folder of your Pentaho server installation.
- Launch Spoon
Create a new transformation, and select the "Execute SQL Script" Step and drag it onto the transformation. - View the properties dialog
by double clicking on it, or right-click → Edit
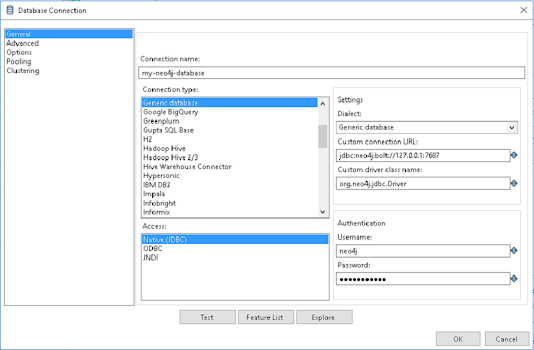
Then on the Connection property, click New - Use the following Connection Settings:
Use the following settings (These would be typical settings for a default neo4j installation. You may need to customize these according to your server settings):Connection Name<A unique descriptive name>Connection TypeGeneric databaseAccessNative (JDBC)Custom connection URLjdbc:neo4j:bolt://<servername>:<bolt port>Custom driver class nameorg.neo4j.jdbc.Driver *note this is case sensitive!Username<neo4j username>Password<neo4j password> - Click "Test" and verify connectivity to your neo4j database
If successful you should see the following message: - "SHARE" this database connection
with other transformations/jobs, otherwise you would have to repeat these steps for EACH Transformation/Job.
Switch from the Design to the View Tab - Expand Database connectionsRight-Click on your new database connection and select Share
You will know the connection is shared if it is displayed in "BOLD"
Now this connection is available to all jobs/transformations for this installation of Spoon/PDI
Now you have a Neo4j data connection for all the generic tasks that support SQL style tasks. Next we want configure the custom Neo4j Output plugin: - At the top under the Neo4j header select "Create connection"
- Use the following settings (These would be typical settings for a default neo4j installation. You may need to customize these according to your server settings):Connection name<A unique descriptive name>
I use the same connection name as above to keep things simple!Server or IP address<address of your neo4j server>Database name (4.0)neo4jVersion 4 database?checkedBolt Port7687Browser Port7474Use routing, neo4j:// protocoluncheckedRouting PolicyUsername<neo4j username>Password<neo4j password>Use encryption - Click Test to verify your connection
- Now you can use The Neo4j functions like Neo4J Output, Neo4j Cypher, Graph Output and others. Here's an article that dives much deeper into their functionality.


No comments:
Post a Comment
Have a comment? Would love to hear it!