I was a little late to the #NeoDash game. I'm not quite sure how this one got past me, but I discovered NeoDash at GraphConnect 2022 on the last session on the last day, and it was by far the best gem I mined from the conference! If you haven't used it yet, it is an extremely easy low-code method for delivering dashboards and visualizations for #Neo4j.
At my previous job, I linked the dashboard site within MS Teams channels for various project/reporting reviews, and it put the power of our Neo4j knowledge graph right at my colleagues' fingertips!
Getting started has been made very easy. There is even a free cloud hosted version that you can use at neodash.graphapp.io This is a great way to create your dashboard configurations with virtually NO installation - by far the easiest method if you are already using #AuraDB cloud hosted Neo4j. NeoDash supports both an on-premise Neo4j server and/or connecting directly to an AuraDB cloud instance. If you are self-hosting there would be more complex firewall configurations to use the graphapp.io hosted NeoDash - so in those cases (your private/public cloud tenant, or hosting on a local Docker container), using your own NeoDash installation may be more practical.
If you are hosting this in production you likely want to host your own dedicated standalone version of the dashboard (which turns off the editor and lets you publish the dashboard configurations for read-only access.) I wanted to use the docker container and host it on a public cloud provider for a non-profit client that already had a Microsoft #Azure sponsorship subscription. I had not yet deployed anything using Azure Web App for Containers before this project, but it appears to be an easy and cost-effective Azure hosting method for this type of application.
The configuration is pretty straight-forward. The biggest challenge I came across was determining how and which docker parameters needed to be configured and how best to assign them. I prefered to accomplish this using the Azure CLI powershell commands.
NeoDash has excellent guides and instructions, and I found everything I needed in the developer guide for running the docker instance.
I put this guide together to help get you up and running quickly.
With that - let's get started!
Pre-requisites
|
|
- Navigate to:
Azure Console → Create a resource → Search for "Web app for containers"
Click "Create" - Create Web App - 'Basics' tab options:
Subscription: <choose your Azure subscription>
Resource group <choose existing or Create new>
Name: <give your Web App a userful name>
Publish: Docker Container
Operating System: Linux
Region: <choose your region>
Linux Plan: <choose your plan>
Pricing Plan:
Huzaah! There's even a Free plan! - this is CPU usage limited, so based on your needs you may need to upgrade this, but a great way to test this out. - Skip the Deployment tab
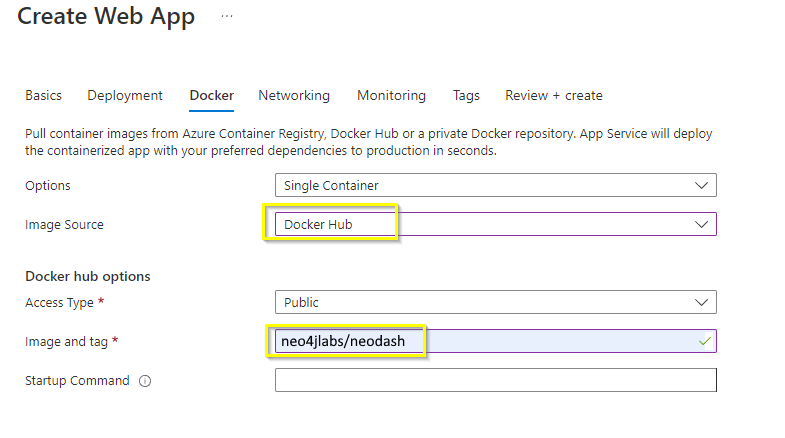
Select the "Docker" Tab
Image and tag: neo4jlabs/neodash
Image Source: Docker Hub
(unless you have created your own image in a repo)
Access Type <Public or Private>
Startup Command: <leave blank>
Warning: If you pull neo4jlabs/neodash from the Docker Hub image source you will always pull the latest version. If you wish to TEST a new version of the dashboard before deploying into production, you may want to reference a specific TAGGED VERSION or create your own custom image BASED ON a particular version, and then store it on your own private Azure Container Registry. Those procedures are beyond the scope of this article. - Skip the remaining tabs
Move to "Review + create" to review your selections
If you are satisfied with the selections click "Create"
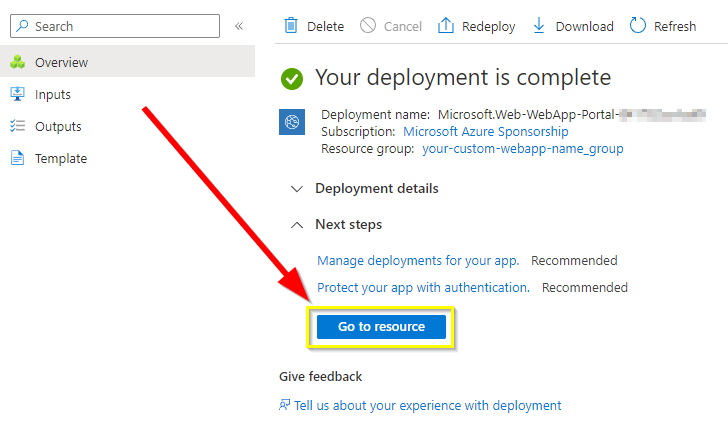
Deployment may take a few minutes to complete. - Once your deployment is complete click the "Go to resource" button.
Before you launch the container, you first need to configure Web App for Containers to use the proper ports, and also pass along parameters that NeoDash needs to identify your Neo4j database, and your dashboard parameters.
For more details see the Configuration section of the Developer Guide.
The settings we will be applying are listed here:
WEBSITES_PORT=5005
standalone=true
standaloneProtocol="neo4j+s"
standaloneHost="myhostname.databases.neo4j.io"
standalonePort="7687"
standaloneDatabase="neo4j"
standaloneUsername="neo4j"
standalonePassword="mysupersecretpassword"
standaloneDashboardName="My Custom Dashboard"
standaloneDashboardDatabase="neo4j"
ssoEnabled=false
You will notice I have ssoEnabled set to 'false' - this is because in this demo I am utilizing the "free AuraDB", and with that comes the limitation of a single user (no DB permissions capabilities). This IS NOT RECOMMENDED for production dashboards! Security practices would demand you have a LIMITED access and READ ONLY at minimum, and SSO / specific permissions would be best case.
This can be accomplished in 2 ways. Personally I prefer the CLI, but either works:
Web UI steps:
In the UI navigate to Configuration → Application Settings →
+ New application setting.
You can pass along your config by adding entries and their values here: - Azure CLI steps:
If you prefer the Azure CLI
From PowerShell:
If you haven't installed Azure CLI yet:
POWERSHELLInstall-Module -Name Az -Scope CurrentUser -Repository PSGallery -Force
Now apply your settings:
POWERSHELLaz webapp config appsettings set --resource-group "myresourcegroupname" --name "My-web-app-name" --settings WEBSITES_PORT=5005 standalone=true standaloneProtocol="neo4j+s" standaloneHost="myhostname.databases.neo4j.io" standalonePort="7687" standaloneDatabase="neo4j" standaloneUsername="neo4j" standalonePassword="mysupersecretpassword" standaloneDashboardName="My Custom Dashboard" standaloneDashboardDatabase="neo4j" ssoEnabled=false
- Navigate to the "Overview" screen.
This is where you can Start/Stop your web app container. It will also show the URL to use to access the page. - Troubleshooting:
There are a few places to check if the container isn't launching correctly. The first is to Navigate to Deployment Center → Logs
This will show the logs of downloading and launching the container.
Just one other item to review:
Ideally you will have the licensed version of Neo4j, and then you can use a limited rights (or at least read-only) db credential for NeoDash to limit access. If not, keep in mind that NeoDash would otherwise be accessing your database with FULL read/write access.
For additional help - check out these resources:


No comments:
Post a Comment
Have a comment? Would love to hear it!