Tuesday, October 18, 2022

Why do we need a knowledge graph?

 This article began as an attempt to document some of the many development projects of a knowledge graph for running the MSP I was partnered at.  I have since exited the parnership - and wanted to share some of the results of my knowledge graph project with others.

In 2011 I merged my IT consultancy business with a relatively new MSP startup.

I was responsible for the service delivery side of our business.  We sold several (too many IMHO) customizable managed user service plans, as well as hardware, software, consulting and integration services. Add to that private cloud hosting, and by 2016 we were starting to add public cloud (Office365 and later Azure)

This presented several challenges around tracking and accuracy:

• Do all the right users had all the right services provisioned
• Are all the endpoints and servers added to RMM, and AV protected (with OS patching)
• Are we billing for the right number of users/services/plans
• Have we de-provisioned and offboarded services for terminated users
• Are all mailboxes, endpoints and servers backed up?  Are they even IN the backup system?
• Did all critical infrastructure make it into our monitoring and NOC?

I knew that to execute a truly comprehensive solution to this problem you ultimately need to be able to easily answer 3 pretty basic questions:

Given a client, show me ALL THE USERS/DEVICES under plan, and a list (or better yet - create a ticket) for any services that are UNDERPROVISIONED or OVERPROVISIONED so that we can correct them.

Have any NEW users/devices shown up, and are they ALSO supposed to be on-plan?

Has the client TERMINATED any users/devices, and should they be REMOVED from service?

Sounds simple enough right?  The problem was very quickly apparent.  

We don't have a single system that can answer those 3 questions.

To build a shared understanding, you would need a list of WHAT YOU ARE DELIVERING and WHAT IS EXEMPT so there could be collaboration between your service director, account manager, and client.

Even if you had a fully integrated PSA/RMM tool (which we didn't) would that system ALSO check to see that 3rd party services were properly provisioned?  (Office, spam filter, backup systems, etc.) - seems unlikely.  Would that system even know if a particular device/user was subject to service add-ons, or exemptions?

Our systems knew the client had a contract, but it doesn't know WHICH users/devices were subscribed to the support plan, and which were exempt.

We knew how our service bundles were built (User received Office365 license, patch management, antivirus, email backup, infrastructure monitoring, and service desk support) but there was no easy way to ask - ARE all those services ACTUALLY provisioned.  It basically meant a lot of manual reporting, and by the time you completed an audit for one client of ALL THOSE SERVICES, it was already out-of-date, and the client likely has added/removed users or changed a-la-carte upgrades/downgrades.

Up to this point we had primarily relied on storing data within our clients' active directory to track users that were part of a plan.  We marked exempt those accounts that weren't plan users.  Also users group membership helped us track licensing/subscription (we were doing some SPLA/multi-tenant hosting as well).

A script ran monthly that queried the clients directory, assembled an Excel billing/usage report, and uploaded it to us.

This helped us improve tracking and billing accuracy. We could also compare usage vs what we were billed from our vendors/distribution.  This helped, but it didn't provide the ability to verify service implementation.  For that we still relied on our implementation SOPs.  If something got missed a manual audit would be required to discovered the problem.  If an  audit wasn't performed, we had to hope someone noticed (hopefully our employee, but often enough that could be our client).  Not ideal!

An interim solution was exporting lists of users/devices from our RMM discovery tool, and then using that to import back into our asset management/PSA/CRM systems.  That DID help make for an more accurate auditing process.  But didn't dramatically improve the dynamic service trackability we were after.  It also did nothing to dynamically (or automatically) verify proper implementation.

At the end of 2017 we merged with another organization, and one of the principals joining us had extensive SQL Server development experience.  I had SQL experience myself, but it was primarily from the support/infrastructure/best practices side, And I really didn't have any experience with database development or table architecture/design.

I thought this would be the perfect solution!  We could just build a data warehouse in SQL server to answer all these questions!

At the time we were using RangerMSP fka CommitCRM (PSA/ITAM/CRM), Managed Workplace for RMM (patching/AV/automation), and CheckMK (a Nagios based NOC monitoring system).

So away we went - ingested data from all 3 systems into a SQL database, and then began writing some queries that would JOIN views together so we could discover discrepancies.

I almost immediately saw this was not going to work.  Just to query those 3 platforms required complex JOINs.  I knew a little TSQL, but I was heavily reliant on our SQL expert to design the database, and write the stored procedures and views.

I knew the relationships between users/devices/services/tickets very well.  My database expert was relatively new to managed services, so was looking to be to provide the layout of the data.  Unfortunately the joins were so complicated that I knew I was going to be unable to assist in any of the database design.  This was going to make the implementation very inefficient.

But hold-on…  WAIT! - We only had 3 systems ingested so far.  We would also need to add in Office 365, Azure, 3 backup providers, active directory, spam filtering, security training, another RMM vendor, QuoteWerks and Vmware data into the warehouse!

Also - JOINS are slow - they are done EVERY time you query - and the MORE data, the More JOINs, and the slower the performance.  

The complexity of adding all those to create a comprehensive view was staggering to even contemplate.

I was disillusioned.  At about the same time, a colleague of mine had been telling me about graph databases.  

I had read a bit about them and watched a few videos about it.  So when he suggested we attend a conference to learn more, I was all-in and attended the Neo4j GraphConnect conference in New York City in 2018.

Hearing about real-life use cases and seeing Neo4j graph databases in action convinced me.  I started writing Cypher code on my laptop on the plane ride home.  The knowledge graph project really started in earnest after this.

First - What is a knowledge graph?  If you aren't familiar, and for our purposes here, it is a representation of the network of devices/events/concepts and users that also shows the relationship between these items.  It is stored in a schema-less node/edge graph database.

If you have a need to integrate multiple structured, unstructured, and semi-structured sources of data from several sources, you need a knowledge graph.

Knowledge graphs are used as a solution to the problems presented by our data being siloed in the various systems we use to manage/support our clients in an MSP.

This allows you to ask complex relationship questions about your clients, their employees, tickets, charges, contracts and opportunities.  From there I use this to facilitate automation, validation workflows and other processes.

…Continued in "A knowledge graph for an MSP"


Sunday, June 26, 2022

Bare bones Configure Apache Hop


Bare bones Configure Apache Hop

Ok - there are in-depth technical overviews of Apache Hop.  This is not one of them.

The intention of this is a stupidly fast, minimum MUST-dos to get someone from zero-to-functioning with Apache Hop.

My primary goal of this was to get Apache Hop working well enough to follow some of my other tutorials.  It's JUST good-enough to get it up and running.

It's also probably good enough if you already have decent ETL experience - especially if you have Pentaho/Kettle/PDI experience!

If you want some more in-depth background - with best practices and feature reviews please check out some of the following videos:

Pre-requisites
  1. SET your HOP_CONFIG_FOLDER

    Because you want to have no-muss, no-fuss Hop UPGRADES when new version come out, and not worry about the binaries mixed in with your config/projects you MUST set some Hop environment variables:

    DO NOT SKIP THIS STEP! - PLEASE AT LEAST set the HOP_CONFIG_FOLDER!

    No! this really isn't optional - set this somewhere fairly permanent, hopefully somewhere you are backing up.

    Perhaps a home directory (or network share) defined you could use something like this:

     CMD SHELL 
    MD %homedrive%%homepath%hop-config
    SETX HOP_CONFIG_FOLDER %homedrive%%homepath%hop-config
    SETX HOP_JAVA_HOME "%java_home%"


    I wanted my Hop config & Projects to move with me between my laptop, work/home PC, so I used my Microsoft Office365 OneDrive. (which also then backs it up to a cloud drive)  This path also (unfortunately) had spaces in the name, so you HAVE to quote it out like this:

    CMD SHELL 
    cd %onedrive%
    MD hop-config
    SETX HOP_CONFIG_FOLDER "%ONEDRIVE%\hop-config"
    
    SETX HOP_JAVA_HOME "%java_home%"

  2. Edit Hop launch scripts (if required)

    If you had to quote your hop-config (or any other Hop environment variables that you configured).  You will also need to ALSO add the quoting within the script/batch file you use to launch Hop:
Simply EDIT those scripts, and add quotes around any of the Environment variables that have spaces in the paths.  This is why it is BEST to use paths without spaces, but this will work but will ALSO REQUIRE you to edit these scripts EVERY time you upgrade the Apache Hop binaries.

  1. HOP_OPTIONS Additional Configuration

    HOP_OPTIONS let you configure things like memory.  These can be set in the launch scripts above (hop-gui, hop-run, hop-server etc).

    Most commonly you may need to increase the JVM Heap size to accommodate larger data sets.

    For example: 

    HOP_OPTIONS=-Xmx512m: start Hop with maximum 512MB of memory
    HOP_OPTIONS=-Xmx2048m: start Hop with maximum 2048MB (or 2GB) of memory
    HOP_OPTIONS=-Xmx4g: start Hop with maximum 4GB of memory

  2. Set your AES Encryption Key

    Security 101 - NO CLEAR_TEXT PASSWORDS in your workflows/script/projects right?
    Apache Hop has built-in AES encryption capabilities for securing your data source passwords.

    Set your AES key environment variable before launching any of your Hop tools.
    Here's a couple examples to set your AES variable on a Windows computer:

     POWERSHELL 
    $env:HOP_PASSWORD_ENCODER_PLUGIN="AES"
    $env:HOP_AES_ENCODER_KEY=ddsfsdfsfsdf

    or

    CMD SHELL 
    SETX HOP_PASSWORD_ENCODER_PLUGIN AES
    SETX HOP_AES_ENCODER_KEY ddsfsdfsfsdf

     In the examples above, I'm just manually setting the AES key.  A better (and more secure way) would be to retrieve your key programmatically (via API call) from a secrets VAULT, password manager, access controlled file/folder or a secure-string encrypted registry key (you get the idea).

  3.  Add any custom JDBC drivers.

    Hop already comes with drivers for many of your most common data sources, so you may not need to do this.  I am working on a project for a CRM/ERP tool that uses a little less common "Advantage SQL Database" (a Sybase/SAP product).  So I had to go download the Advantage JDBC jar file, extract the contents, and place the adsjdbc.jar file into the /lib folder of my Apache Hop installation.

There you have it.  Now you should be ready to get Apache Hop up and running for your first
project! 

For additional help - check out:

Sunday, October 24, 2021

Configure RangerMSP database connection in PDI


Configure RangerMSP (CommitCRM) database connection in PDI

Once your Pentaho server is installed and working, you will want to establish a connection to your RangerMSP database.

This tutorial will show you how to enable connectivity between Pentaho and Neo4j:

What you need to before you begin

  1. Create a Windows File share for the CommitCRM folder.  Grant permissions (file and share) to the computer account of your Pentaho (PDI) server.

  2. Download the Advantage JDBC database driver 11.  You will need to install the driver, then browse to the installation folder, find and copy the jar file into the /lib folder of your Pentaho server installation.


  3. Launch Spoon
    Create a new transformation, and select the "Execute SQL Script" Step and drag it onto the transformation.


  4. View the properties dialog
    by double clicking on it, or right-click → Edit
    Then on the Connection property, click New


  5. Use the following Connection Settings
    note, there is no username/password. rather, access to the DB is controlled via file/share permissions on your RangerMSP server.  Be sure your Pentaho Computeraccount$ has been given file/share permission on the share

    Connection Name
     <A unique descriptive name>
    Connection Type
     Generic database
    Access
    Native (JDBC)
    Custom connection URL
    jdbc:extendedsystems:advantage://<servername>:6262;catalog=//<servername>/CommitCRM/Db
    Custom driver class name
    com.extendedsystems.jdbc.advantage.ADSDriver *note this is case sensitive!
    Username

    Password


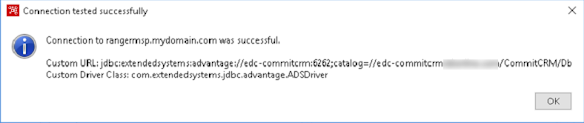
  6. Click "Test" and verify connectivity to your neo4j database

    If successful you should see the following message:


  7. "SHARE" this database connection
    with other transformations/jobs, otherwise you would have to repeat these steps for EACH Transformation/Job.

    Switch from the Design to the View Tab


  8. Expand Database connections
    Right-Click on your new database connection and select Share


You will know the connection is shared if it is displayed in "BOLD".

Now this connection is available to all jobs/transformations for this installation of Spoon/PDI.


Saturday, October 23, 2021

Configure Neo4j 4.x database connection in PDI


Configure Neo4j 4.x database connection in PDI

Once your Pentaho server is installed and working, you will want to establish a connection to your Neo4j database.

This tutorial will show you how to enable connectivity between Pentaho and Neo4j:

What you need to before you begin

Because I frequently use both the generic "Execute SQL script" tasks - which uses the generic PDI database connections and supports multi-transaction CYPHER statements, and ALSO the open source Neo4j output plugin by @mattcasters because it handles data maps and parameters passed from other steps WAY more elegantly than the "Execute SQL script" task.  We will need to configure two neo4j database configurations.

For this tutorial the neo4j server is the same server as the Pentaho Data Integration server. (So you will see the 127.0.0.1 address) - If you have these on separate computers, either use the FQDN or IP address of your neo4j server in the various name/address fields.

  1. Download the latest Neo4j database JDBC driver and place the jar file in the /lib folder of your Pentaho server installation.


  2. Download the latest PDI neo4j output plugin, unzip and place the neo4j output folder in the /plugins folder of your Pentaho server installation.


  3. Launch Spoon
    Create a new transformation, and select the "Execute SQL Script" Step and drag it onto the transformation.


  4. View the properties dialog
    by double clicking on it, or right-click → Edit
    Then on the Connection property, click New


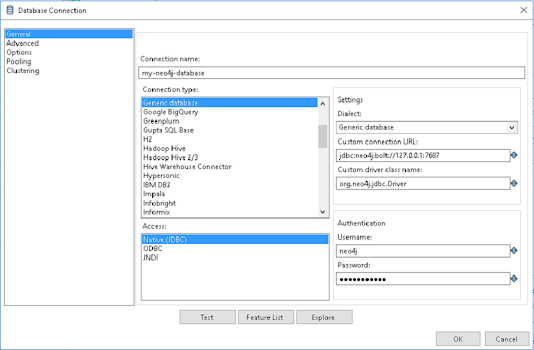
  5. Use the following Connection Settings:
    Use the following settings (These would be typical settings for a default neo4j installation.  You may need to customize these according to your server settings):
    Connection Name
     <A unique descriptive name>
    Connection Type
     Generic database
    Access
    Native (JDBC)
    Custom connection URL
    jdbc:neo4j:bolt://<servername>:<bolt port>
    Custom driver class name
    org.neo4j.jdbc.Driver *note this is case sensitive!
    Username
    <neo4j username>
    Password
    <neo4j password>


  6. Click "Test" and verify connectivity to your neo4j database

    If successful you should see the following message:


  7. "SHARE" this database connection
    with other transformations/jobs, otherwise you would have to repeat these steps for EACH Transformation/Job.

    Switch from the Design to the View Tab


  8. Expand Database connections
    Right-Click on your new database connection and select Share

    You will know the connection is shared if it is displayed in "BOLD"

    Now this connection is available to all jobs/transformations for this installation of Spoon/PDI

    Now you have a Neo4j data connection for all the generic tasks that support SQL style tasks.  Next we want configure the custom Neo4j Output plugin:

  9. At the top under the Neo4j header select "Create connection"


  10. Use the following settings (These would be typical settings for a default neo4j installation.  You may need to customize these according to your server settings):

    Connection name
     <A unique descriptive name>
    I use the same connection name as above to keep things simple!
    Server or IP address
    <address of your neo4j server>
    Database name (4.0)
    neo4j
    Version 4 database?
    checked
    Bolt Port
    7687
    Browser Port
    7474
    Use routing, neo4j:// protocol        
    unchecked
    Routing Policy

    Username
    <neo4j username>
    Password
    <neo4j password>
    Use encryption    


  11. Click Test to verify your connection


  12. Now you can use The Neo4j functions like Neo4J Output, Neo4j Cypher, Graph Output and others.  Here's an article that dives much deeper into their functionality.

Configuring Pentaho Data Integration (PDI) on Windows


Configuring Pentaho Data Integration (PDI) / Kettle community edition on Windows:

This short tutorial will focus on Setting up a PDI server to ingest data from RangerMSP into Neo4j.
You should first setup and configure a working Neo4j 4.x server (it can be on the same server).  


What you need to before you begin
System Requirements:

  • Prepare Windows for Install
  • Virtually all modern desktop/server OS are supported
  • JAVA x64 (OpenJDK/OracleJDK) 8.x
  • Neo4j Server, Developer or Desktop Edition
  • Pentaho 9.x Community Edition Download here
  • Be aware the latest neo4j DB (4.x) requires JAVA 11.  PDI requires 8, so you will need to install BOTH! 

  1. Verify the JAVA_HOME system variable.  For my installation I used the OpenJDK so the path was C:\Program Files\AdoptOpenJDK\jre-8.0.265.01-hotspot

  2. Extract the archive into the folder you want to be your installation folder

  3. Navigate to the installation folder and run spoon.bat


  4. IF you see the _PENTAHO_JAVA variable point to a JAVA version other than 8 then prepend a proper path to the JAVA version 8 at the beginning of the spoon.bat:

    SET JAVA_HOME =C:\Program Files\AdoptOpenJDK\jre-8.0.265.01-hotspot

  5. BE PATIENT.  It takes a little while to load.  After a moment you should see the Pentaho Data Integration splash screen:


    This will stay on the screen for a minute or so, and then the program will finish loading.
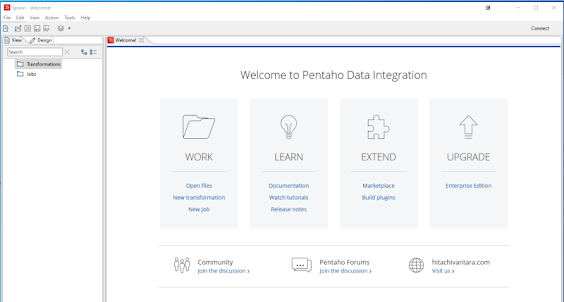
    If all went well you should now see the welcome screen:


  6. Ok - now we need some connectivity.  You want to query a Microsoft SQL Server database right?   Of course you do!  Why not?

    First Download the Microsoft JDBC driver for MS SQL Server.

    Extract the contents.

  7. Copy the mssql-jdbc.x.y.z.jre8.jar into the \lib folder of your PDI installation folder (assuming you are using JAVA JRE/JDK v8.  That's it!  next time you launch spoon it will have the SQL jdbc driver available.

    For some more data connectivity examples see the following:

Configuring Neo4j 4.x server on Windows


Configuring Neo4j 4.x server on Windows:

This is an update from a previous article based on Neo4j v3.x

Yes, there are plenty of tutorials for setting up Neo4j already, but I wanted to focus on a few settings that makes it easier to use it with data integration.

This tutorial will focus on Neo4j server for windows.  It is NOT very complicated, and you'll be up and running in no time flat:

What you need to before you begin
System Requirements:

  • Virtually all modern desktop/server OS are supported
  • JAVA (OpenJDK/OracleJDK/ZuluJDK) 11
  • Neo4j Server or Desktop Edition.For these instructions I used the community edition which you can download from https://neo4j.com/download-center/#community

  1. Extract the archive into the folder you want to be your installation folder
  2. Use an editor to modify /conf/neo4j.conf
    Setting
    Action
    Description
    #dbms.directories.import=import
    Comment out
    allows custom imports on-demand
    apoc.import.file.enabled=true
    dbms.security.procedures.allowlist=apoc.coll.*,apoc.load.*,gds.*,apoc.*
    dbms.security.procedures.unrestricted=apoc.schema.*
    add
    Allow APOC file imports
    and apoc procedures
    #dbms.memory.heap.initial_size=5g
    #dbms.memory.heap.max_size=5g
    #dbms.memory.pagecache.size=7g
    customize memory
    Memory configuration will depend on how large your graphDB will become.  Here's a good primer:
     
    https://neo4j.com/docs/operations-manual/current/tools/neo4j-admin-memrec/
    dbms.connectors.default_listen_address=0.0.0.0
    uncomment
    Allows non-local connections

  3. Example Configuration for Plugins*:
    Plugin
    Description
    Download URL
    Notes
    Don't ask, just install it.  No really!  You want this.
    Install binary .jar into /plugins folder:

    You need to MATCH the APOC version with the Neo4j version!
    MSSQL JDBC
    Add this if you need to connect to MS SQL
    Extract mssql-jdbc-9.x.x.jre11.jar into /plugins folder
    Excel (multiple file formats)
    If you need support to import from these formats download the dependencies
    https://repo1.maven.org/maven2/org/apache/poi/poi/5.0.0/poi-5.0.0-javadoc.jar
    https://repo1.maven.org/maven2/org/apache/poi/poi-ooxml/5.0.0/poi-ooxml-5.0.0.jar
    https://repo1.maven.org/maven2/org/apache/poi/poi-ooxml-schemas/4.1.2/poi-ooxml-schemas-4.1.2.jar
    https://repo1.maven.org/maven2/org/apache/xmlbeans/xmlbeans/5.0.2/xmlbeans-5.0.2.jar
    https://repo1.maven.org/maven2/com/github/virtuald/curvesapi/1.06/curvesapi-1.06.jar
    Place these .jar files into the /plugins folder
    Advantage Database JDBC
    To connect to Advantage (sybase) SQL  via JDBC
    This is to support the CRM I use (RangerMSP)

  4. *For most of my installations I ONLY install the APOC plugin.  This is because I typically use an ETL tool like Pentaho Data Integration for ingesting data from other sources (Excel, JDBC, etc), rather than natively from a Neo4j cypher query.  This makes it easier to manage security, tasks and jobs  rather than hard-coding right into a CYPHER statement.

  5. Configure Windows Service
    Neo4j should be configured to run as a Windows service. Launch a command shell, and install the service from within the /bin folder

    neo4j install-service

    If you are upgrading from an older version, you will need to first unregister the service for the old version:
    neo4j uninstall-service
      
  6. Set Initial Password
    neo4j-admin set-initial-password mysupersecretpassword

  7. Start the service
    sc start neo4j
    (or use the service control panel)

  8. Verify your installation.  Browse to http://127.0.0.1:7474
    username: neo4j
    password: <same as you supplied on step 5>


    That's it!  You should be ready to go with a neo4j server that's ready to connect to SQL Server, import from CSV/XLS files, and you will have the APOC library plugins at your disposal!

Thursday, February 11, 2021

Neo4J Installation on CentOS

note: This was some internal documentation I wrote a couple years ago.. based on neo4j 3.5.14 for CentOS, but with some small adjustments you can perform against newer versions, and other Linux distros..


# Patch your new CentOS installation:
yum -y update
yum -y install epel-release
# I like htop
yum -y install htop

# First, you'll need the yum repository and key.
rpm --import https://debian.neo4j.org/neotechnology.gpg.key
cat <<EOF>  /etc/yum.repos.d/neo4j.repo
[neo4j]
name=Neo4j RPM Repository
baseurl=https://yum.neo4j.org/stable
enabled=1
gpgcheck=1
EOF

# View available versions/editions:
yum list neo4j

# I'm going to install the latest community edition, so here we go:
yum -y install neo4j-3.5.14-1

#verify installation
rpm -qa | grep neo

# Increase the open file limits for the neo4j service
#https://community.neo4j.com/t/warning-max-1024-open-files-allowed-minimum-of-40000-recommended-see-the-neo4j-manual/3679/7

systemctl edit neo4j.service

# Paste the following values into the file and save:

* soft nofile 40000
* hard nofile 40000


#create firewall service template for neo4j bolt, http, and https protocols (modify if you do not want to allow all 3)
cat <<EOF>> /usr/lib/firewalld/services/neo4j.xml
<?xml version="1.0" encoding="utf-8"?>
<service>
  <short>neo4j</short>
  <description>Neo4j is an ACID-compliant graph database management system developed by Neo4j, Inc.  Neo4j supports clients using either the Bolt binary protocol or HTTP/HTTPS.</description>
    <port protocol="tcp" port="7687"/>
  <port protocol="tcp" port="7474"/>
  <port protocol="tcp" port="7473"/>
</service>
EOF

# Add our newly created service to the firewall, reload and verify
firewall-cmd --permanent --add-service=neo4j
firewall-cmd --reload
firewall-cmd --list-services

# If you have SELinux you'll need to do this as well:
semanage port -a -t http_port_t -p tcp 7474
semanage port -a -t http_port_t -p tcp 7473
semanage port -a -t http_port_t -p tcp 7687


# Change the default password
cd /usr/bin

neo4j-admin set-initial-password Password1

# Configure neo4j connector to allow network connections
# use an editor to modify /etc/neo4j/neo4j.conf
# uncomment the line dbms.connectors.default_listen_address=0.0.0.0 if you want to accept non-local network connections

#You should adjust your memory settings.  For recommendations see
# https://neo4j.com/docs/operations-manual/current/tools/neo4j-admin-memrec/

# Add any plugins.  I can't live without APOC, so here we go:
cd /var/lib/neo4j/plugins

wget https://github.com/neo4j-contrib/neo4j-apoc-procedures/releases/download/3.5.0.6/apoc-3.5.0.6-all.jar

# and because I am connecting with SQL Server, I will need the SQL JDBC 7.x jar
cd /tmp
wget https://download.microsoft.com/download/2/F/C/2FC75210-EDDE-464C-8E54-45C0291032FF/sqljdbc_7.0.0.0_enu.tar.gz

tar -xzf sqljdbc_7.0.0.0_enu.tar.gz
cp /tmp/sqljdbc_7.0/enu/mssql-jdbc-7.0.0.jre8.jar /var/lib/neo4j/plugins/

# I also want Advantage (SAP Sybase) JDBC:
cd /tmp
wget http://devzone.advantagedatabase.com/dz/download.aspx?Key=iE/9IfXlCOePTGOfVrmGwsL+4iRlo8+R -O adsinstall.jar
unzip adsinstall.jar -d /tmp/ads
cp /tmp/ads/jdbc/adsjdbc.jar  /var/lib/neo4j/plugins/

# Configure neo4j service to start automatically
systemctl enable neo4j
systemctl start neo4j